Sunday, November 2, 2014

A Very Scary Cake


Hello friends! I hope everyone had great Halloween! I made a fun cake and wanted to share it with you. I saw the recipe on From A Whisper To A Scream Blog originally. Except I made the frosting from scratch, made it into a cake instead of cupcakes and changed the "Blood" a little bit. Other than that I followed the directions and it turned out Spooktacular!
The humidity was high the day I made the blood so I omitted the water. Also I only added 1 drop of blue instead of 3 drops of blue food coloring it called for as it would've made it way to dark. I don't have much experience in the "candy making department" but it turned out perfect. It took about 45 mins. to get the sugar mixture to reach 302 degrees (Hard Crack Stage) so make sure you have the time if you want to serve this scary bloody mess to friends and family! I prepared the glass the day before Halloween and let it sit in a cold oven over night to harden properly. This recipe is very inspiring to me to venture out of my baking and do a little more candy making this holiday season!

Monday, September 15, 2014

The Book Has Arrived!


Hi friends! These 2 images belong to Aimee Ray. I was so excited to see these pics in her flickr photostream I had to snag them lol. Last year Aimee asked me to be a contributor in her book The Holiday Motif Collection. It's available through Amazon now in case you're interested. See the little teapot cozy up there in the left hand corner? I designed and wrote the pattern for it. I haven't seen the book in person yet so I'm dying lol. Aimee's doing a giveaway on her blog this week. Head on over to Little Deer Tracks and enter in to win a FREE copy! Aimee, in case you're reading this post: Thanks so much for everything! I'm so thankful to be a part of your fun crafty book!
Here's a link to my flickr: Annie Kight of Pinks & Needles
Here's a link to Aimee's flickr: Aimee Ray aka Merwing


Thursday, September 11, 2014

Some Halloween Pin Toppers from the Haunted Crafty Cottage

Hands Down Halloween's my favorite holiday! Looking forward to creating some spooky pins this year! This little collection is from years past. If by chance you'd like to place an order in the month of September be prepared for a Scary Freebie Surprise Pin Topper with every purchase! Right now I'm working on a OOAK Pincushion Vignette which I hope to post very soon!


Friday, August 29, 2014

Alice in Wonderland Flamingo Croquet Mallet & Hedgehog Ball Pin Toppers


I owed a friend of mine a favor and his mom just happens to like sewing and Alice in Wonderland! So I created her this trio of pins.

Do you remember the part in the movie where Alice plays croquet with a flamingo as a mallet and that poor little hedgehog is smacked around like a ball?
I have always loved the Queen of Hearts' garden in the movies. I designed the tree to represent her and also when she demands that the roses be painted red (hence the one little rose in the left hand corner with red edges.
I decided to make this set available in my shop. Each pin is a la carte too!

Thursday, August 21, 2014

LOVE Patchwork & Quilting Magazine Blurb


Hello Friends~
Well it's been a really long time since I've posted here on Blogger. It's quite embarrassing actually lol. Anyway, I'm trying to stay connected as of now let's see how it goes!
Tomorrow in the UK my little pins will be in issue #10 of LOVE Quilting & Patchwork! So excited to see it in person! Here's the proof page:
When I was contacted the gal asked if they could use pictures of my pins from Etsy since there wasn't enough time for me to make pins and then send them so I sent her a few pics to choose from. Whoever edited my original photo did an excellent job! This is a shot of my original here:

Kinda cool huh? I thought so too : )
Well friends I hope to post again very soon. I'm working on a Halloween pincushion already which I'm very excited about! Fingers crossed I can stay on track.
I bid you adieu,
Annie

Sunflower Sisters


A gal contacted me recently and asked if I could make her some special Sunflower pins for a quilting retreat she's attending up in Washington State next week. She and her friends call themselves The Sunflower Sisters! The seeds in the photo are Mammoth and I'm growing them in my yard this Summer. Some of them are reaching as high as 10 feet so far!

Triple Layer Vanilla Cake with Pink Icing and a Garden Rose Pin Topper


I love it when someone orders a pin from me and they say "Can you make me something special?"
My answer is always Yes! I've only made a triple layer cake slice one other time because it's a bit time consuming but I'm happy to say I'll kindly do it again.


I sculpted the rose in white and then painted it after it was baked so it ended up with a little more detail than usual.
The Mad Hatter Pincushion available too in many color combinations! I'm working on a dark gray schemed one for Fall. More pics coming soon.

Sunday, August 10, 2014

An Old Fashioned Favorite

A Birthday Girl requested Old Fashioned Home Made Chocolate Chip Cookies for her birthday CAMP OUT last night. My mom was an amazing baker back when I was growing up. She loved crisp light cookies the best. In the recipe following I've adapted an American Icon's classic Blue Ribbon Recipe ~ Mrs. Debbi Fields!

2 1/2 c all purpose flour
1/2 t. baking soda
1 c. brown sugar
1/4 c white sugar (Mrs. Fields uses 1/2 c. sugar)
1/4 flaked coconut (Mrs. Fields omits coconut)
2 sticks of butter (salted & softened)
2 large eggs
2 t. vanilla extract
1 c. chocolate chips (Mrs. Fields uses 2 c. of chocolate chips)
1 c. chopped walnuts (Mrs. Fields omits walnuts)

Has anyone ever heard about baking cookies SLOW & LOW before? I swear it really does the trick.
Preheat oven to 300 degrees F.
In a medium bowl combine flour, baking soda and salt. Mix well and set aside.
In a large bowl of an electric mixer, blend sugars and butter to form a grainy paste. Scrape the sides of the bowl down. Add eggs and vanilla just until blended ~ DO NOT OVERMIX!
Add the flour mixture, chocolate chips, coconut and walnuts at low speed ~ again do not overmix! Drop the dough by rounded Tablespoons onto an ungreased cookie sheet about 2 inches apart. Bake for 18-22 mins. I usually bake at 18 mins on the dot but some ovens are different. Transfer immediately to a cool surface or wire rack.


Sunday, July 20, 2014

Quick n Easy Black Bottom Banan Cream Pie

Good morning friends~
I came up with a twist for a very easy Banana Cream Pie yesterday! Just wanted to share with all of you.
In a food processor pulverize 9 graham crackers (usually one sleeve) + 6 T. melted butter + 1 heaping T. granulated sugar. Mix well and press into a pie plate. Bake at 375 for 7 mins. Let cool.
 
Here's the twist: melt 1/3 c. chocolate chips (I used bittersweet) + 1 T. milk ~ spread over bottom of the cooled crust and let cool again.

Prepare a 3 oz. box of vanilla or banana pudding with 1 3/4 c. milk ~ spread over chocolate bottom.

Slice a LARGE banana as thin as possible and lay them down on the pudding. This particular banana gave me just the right amount!
Whip a pint of heavy whipping cream + 1/2 vanilla extract and 1 T. powdered sugar and spread in a pretty design over the top of the bananas.
Top with a pretty flower from your garden!
This pie is best chilled very well.
Enjoy with a favorite cup of coffee or milk! Yummy!

Tuesday, June 24, 2014

Hello Friends~
Well it's been a very long time and to be truthful I'm a bit embarrassed lol. I'll try and post more regularly starting......NOW!
Tomorrow in the UK my little pins will featured in LOVE Patchwork & Quilting issue #10! I can't wait to see it in print. So far all I have is the proof page here:
I love all the colors and how they came together on this page : )
When they contacted me there wasn't enough time for me to make and send them actual pins so the gal asked if they could use existing pictures from my Etsy shop. Whomever edited my pic did such a good job don't you think? Here's the pic I submitted:

If you're reading this post and you just happen to place an order please convo me and mention "LOVE Patchwork & Quilting" and I'll send you a FREEBIE PIN with your ORDER!
Until then Friends, I bid you adieu, Annie

Friday, November 1, 2013

Post Halloween Quiche - fresh from the Wicked Witch of the West Coast's oven!

Really Easy and so delicious! I made up this recipe and want to share : )

Ingredients:

1 Pilsbury pie crust (room temp)
4 eggs
1 c milk
1 dollop of sour cream
2 c fresh broccoli chopped pretty small (do not use frozen)
1/2 c + 1 more cup finely shredded cheese (I used Monterey Jack/Colby mix)
1/2 small yellow onion minced
1 clove pressed garlic
salt and pepper to taste

Preheat oven to 350 degrees.

1. press your pie crust into a pie pan and poke a few holes in it with a fork.
2. sprinkle 1/2 c cheese into bottom of pie crust and put in oven for a few mins to melt the cheese while the oven is preheating. This step creates a barrier so your crust doesn't get soggy. Take it out of the oven and set a side once cheese is melted.
3. Saute onion, garlic and broccoli until almost soft. Spread evenly in pie shell.
4. Mix eggs, sour cream and milk until well blended. Pour over broccoli mixture.
5. Sprinkle remaining 1 c. of cheese on top and sprinkle with salt and pepper.
6. Bake for 30 mins or until middle of quiche doesn't wiggle : )
7. Let rest for about 10 mins before cutting into slices.
8. Enjoy with your favorite fresh fruit and homemade muffins!

Saturday, August 24, 2013

Breakfast of Unicorns

It feels like rain this morning but it's hot out....hmmmm...what to do....what to do?
Oh I got this! Gather round little unicorns and join me for a spell. I know lollipops don't grow on trees but hotcakes do!
Super Easy Recipe:

Any ole pancake mix will do, just separate into however many colors you want in your rainbow stack.

Add food coloring as desired. I prefer the gel colors ~ they seem to be extra vibrant.

In a large skillet melt some coconut oil or olive oil and cook your cakes as low as possible to avoid turning your rainbow into mud.

Stack with yogurt spread or buttah and drizzle some maple syrup over the top.

Smiles guaranteed : )

Thursday, August 22, 2013

Go On Dig In ! Litter Box Cake! Mmmmm! Blahhh!

 
If you don't have a sense of humor then this post isn't for you...but in case you do......... Made this for my best friends birthday! Just think what I'd make if I didn't like the person ~ lol!

Easy Instructions:

Bake a German Chocolate Boxed Cake as directed in a 13 X 9 foil pan

Let cool

Remove from foil pan and cut it in half. You will only use half of this cake total so you can freeze the other half.

Cut cake into small 1 inch cubes or even smaller. Put back in foil pan.

Prepare 1 small "Cook n Serve" box of vanilla pudding and let cool. Spoon pudding over cake cubes.

Stir until very smooth and kind of runny 1 container of Coconut Pecan Frosting. Spoon about half of the container randomly over the cake cubes and pudding.

Remove frosting from between the layers of a package of Golden Oreos and crush finely. Reserve about a 1/4 cup.

Add blue and green food coloring to reserved cookie crumbs ~ I sprinkled a little water in to get the color even. This is to represent chlorophyll in cat litter.

Sprinkle the Golden Oreos over the cake, pudding and frosting.

Warm about 1 dozen Tootsie rolls in microwave for only 5-10 secs. You want them warm to the touch so you can mold them into the "kitty treats"! Hang one over the edge of the litter box for a very gross and disgusting added touch. Form others by twisting slightly and touch a few together for longer poops.

Lay them however you please on top of the cookie crumbs.

Sprinkle the chlorophyll very sparsely and now you're ready to make everyone laugh and gag at the same time!

Time to enjoy!

You can always buy a new litter box and pooper scoop if you really want to make this realistic! Newspaper adds a funny touch too!

Friday, February 15, 2013

Bed Pincushion

Here's a custom pincushion I've been working on for a few weeks! My very first bed pincushion : ) It's been a lot of fun making the accessories i.e. the bra and pillows ~ hee hee!

Saturday, February 2, 2013

Bunny Love Valentine Pincushion Set

Bunny Love is in the air! He's so fuzzy, chubby and cute.....just hoppin' around his little love nest : )

Monday, January 28, 2013

Etsy 5th Anniversary Pin Topper Trios

Hello friends! I'm so happy to announce Pinks & Needles is celebrating 5 years on Etsy in February!
I will be giving away this mini trio of pin toppers to anyone who places an order of $75 or more throughout the month of February!
Thank you to all of my friends and family for supporting my little shop these past years!

Thursday, December 20, 2012

Basket full of hand warmers - this thing weighs over 25 lbs!

I have been the biggest Blog slack....I'm terrible! My life is so different these days. I've been at my parents house getting ready for the holidays. I made 42 sets of hand warmers....they took a long while but I really like how they turned out! Hopefully our dinner guests will enjoy them too.
I had some left over feed corn so I made my big fat cat an extra EXTRA large pillow size one for her cat house out on the back porch. She loves it! I pop it in the microwave for 2 1/2 mins a few times a day and she's in heaven : )
U hope everyone's having a great holiday season thus far! Only a few more days!

Monday, July 23, 2012

Shabby Miniatures

Golly you can tell I'm really not into blogging lately...not becasue I don't want to but my computer died again! Finally had to get a new one.
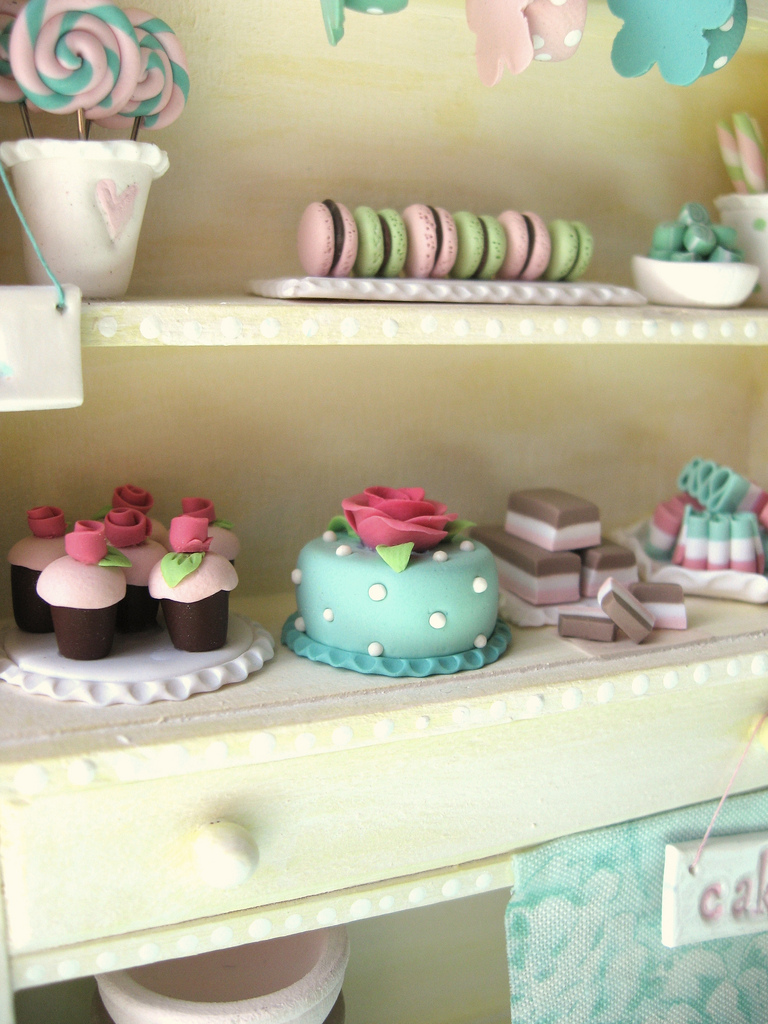
Anyway, been busy on Etsy and adding new things like this cute little confectionery cabinet full of shabby goodness!


Have a lovely day everyone!


Thursday, May 24, 2012

I'm Back - and with a NAME change!

Hello All!
Yes you could say I really did fall off the face of the planet but I'm back. In all honesty I was sparing all of you from my up and down roller coaster of a failing marriage. I'm finally ready to go public with the news.....but I'll still spare you from the details. Just know that I am looking forward to getting back into the swing of blogging, creating and finding happiness again
I changed my Etsy shop name from GigiMinor to PinksAndNeedles which feels really good. My ex-husband called me Gigi and my married name was Minor so I'm going back to my God Given name of Annie Kight. I don't expect any of you to keep it straight but I thought I should at least make the effort to turn a fresh leaf so to speak.
Thank you to all of my friends and family that have seen me through this very intense past year. I don't know how I would've survived any of it without the late night phone calls and mid day rants to boot.
I'm still picking up the pieces and getting my head straight but I finally see light at the end of the tunnel. 
I'm really looking forward to reconnecting with all of you. If anyone is going through a hard time right now please feel free to leave a comment and let it all out! I'm here to listen.

Peace,
Annie


Wednesday, November 23, 2011

$5 Stocking Stuffers


Hello Friends~
Just wanted to do a quick post about some cute little mini pin toppers I just listed in the shop! They would all make great stocking stuffers don't you think? I only have one of each made up at the moment!